I ran into a problem today…. I wanted to install SP1 for Visual Studio 2008 on my virtual pc instance today. I started the install and got an error stating I did not have enough space on my drive to do so. I was about a gig short. This is on a VPC too… NO BUENO mi amigos.
NO bueno at all.
After trying a bunch of tools and different methods, I finally got something to work and I’m going to document it here.
Tools You’ll Need To Do The Job
Install all of these prior to starting the resize.
VHD Resizer – This bad little mama-jama will take your VHD file and add space to it. Essentially, it creates a new VHD, and then copies over your files onto the new VHD file.
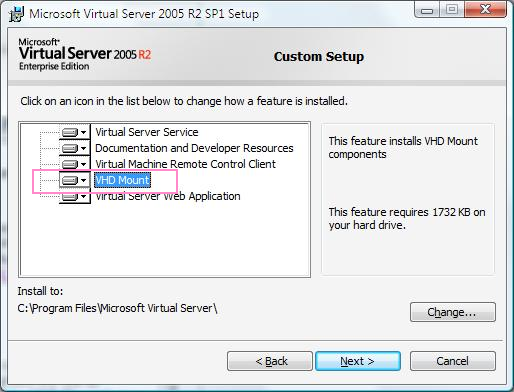
- VHDMount – This is a component that is part of the Virtual Server 2005 download. Be sure to ONLY install this as you wont need all the Virtual Server mumbo jumbo. See the image below.
3. diskpart.exe – A little Microsoft Utility that allows you do more than the regular disk management GUI. All kinds of goodness in here. The only downfall is that it is a command line utility.
How To Get The Job Done
Important note: This process will take up to an hour if not MORE to complete. So give yourself some time.
Normally if you need space you can add another partition and create a new drive on that partition. However, for reasons of upgrades for a previously installed app (VS2008) I need more space on C, therefore I need to resize my hard drive.
1. Resize the VHD with VHDResizer.
- Open VHDResizer.
- The application will ask you for the VHD you want to resize. Select that drive and then select a destination location.
- Now select the “New Size” as shown below. In this case I’ve decided to bump up from 16 GB to 25 GB.
- Click “Resize”. Now go get lunch. This will take awhile.

2. “Plug in” the vhd as a new mount point.
We need to plug this VHD into our host machine so we can operate on it.
F:\VPC\Base>”C:\Program Files\Microsoft Virtual Server\Vhdmount\vhdmount.exe” /p
XPSP2_VS2K8_SQL05_BASE_25GB.vhd
The results will look like this:
The specified Virtual Hard Disk (VHD) is being plugged in using the default Undo
Disk option. Use /c to commit or /d to discard the changes to the mounted disk.The Virtual Hard Disk is successfully plugged in as a virtual disk device.
3. Run diskpart and expand the volume
Fire up diskpart:
F:\VPC\Base>diskpart
Microsoft DiskPart version 5.1.3565
Copyright (C) 1999-2003 Microsoft Corporation.
On computer: DONNF-PC
Find which volume you need to expand. In this case my volume was “Volume 4”.
DISKPART> list volume
Volume ### Ltr Label Fs Type Size Status Info
———- — ———– —– ———- ——- ——— ——–
Volume 0 E OFFICE12 CDFS DVD-ROM 253 MB
Volume 1 D New Volume NTFS Partition 75 GB Healthy
Volume 2 C OSDisk NTFS Partition 112 GB Healthy System
Volume 3 F FreeAgent D NTFS Partition 233 GB Healthy
Volume 4 G NTFS Partition 16 GB Healthy
Select the volume so that you can work with it.
DISKPART> select volume 4
Volume 4 is the selected volume.
Extend the volume using the extend key word
DISKPART> extend
DiskPart successfully extended the volume.
The disk has now been extended. We now need to view the volumes size, so run a list volume again.
DISKPART> list volume
Volume ### Ltr Label Fs Type Size Status Info
———- — ———– —– ———- ——- ——— ——–
Volume 0 E OFFICE12 CDFS DVD-ROM 253 MB
Volume 1 D New Volume NTFS Partition 75 GB Healthy
Volume 2 C OSDisk NTFS Partition 112 GB Healthy System
Volume 3 F FreeAgent D NTFS Partition 233 GB Healthy
Volume 4 G NTFS Partition 25 GB Healthy
We see that the new size is 25 GB. It worked. Cool.
4. “Unplugging” the Disk
At this point we are almost done. We just need to unplug the disk from our machine. We will use VHDMount for this again.
Run the following command:
F:\VPC\Base>”C:\Program Files\Microsoft Virtual Server\Vhdmount\vhdmount.exe” /u /c XPSP2_VS2K8_SQL05_BASE_25GB.vhd
Virtual disk device(s) successfully unplugged.
Merging Undo Disk(s) to parent disk(s). This may take some time.
Undo Disk(s) successfully merged.
When vhdmount mounts the disk it creates an undo disk that houses all of the changes that are done during the mount. Then, before unmounting the disk we have to tell VHDMount if we would like those changes committed or deleted. The /c switch commits those changes. These changes are merged into the disk. The /u switch unplugs the disk from the machine (unmounts it).
5. DONE
We are done. Fire up virtual PC and create a new virtual machine (vmc file) through the wizard and connect to the machine. You will now have a larger C drive.
Enjoy. 🙂
Update: When I tried to do this again an hour later on another VHD I received an error stating that VHDMount was not a valid Win32 application. WTF? I had to uninstall and reinstall VHDMount for it to work again.
