Audio quality is our #1 concern (other than content) on the Fragmented Podcast (a Podcast for Android Developers).
Our goal is to give you, the listener, the experience of sitting with us (and our guest) as if you were there in person.
Nothing will kill a podcast faster than shitty audio.
I can’t tell you how many times I’ve listened to a podcast that I really loved but eventually had to turn it off due to the terrible audio. If your audio is crap, it doesn’t matter how good your content is because terrible audio will kill your listenership.
Microphones and Audio Interfaces
You’ll want a quality microphone. We use the following from lowest to highest price.
- ATR2100 USB (the same mic we use at Caster.IO and it’s the same one used on the Tim Ferriss podcast)
- Shure SM58
- Shure Beta 87A (our favorite and what we use to record the show)
- Heil PR40
- Shure SM7B (the same mic used on the Joe Rogan podcast)
Audio Interfaces
For the SM58, Beta 87A, PR40 and the SM7B you’ll want an audio interface to connect the mic and to power it (Beta 87A & SM7B require power).
The ATR2100 USB connects directly to your computer with USB, so you won’t need an interface, though it does have an XLR connector so you can also use to connect it to an Audio Interface. We recommend using one of the following interfaces:
If you’re going to use the SM7B you’ll need some more juice. We recommend adding the Cloudlifter inline amp to help as the 7B needs some more power to really sound great.
Travel Interfaces
The interfaces above are rather clunky and will pretty much be sitting your home desk or studio once set up. If you need a mobile rig that can do both, you’ll want to use the following:
You can throw this thing in a bag with a couple of mics and you’er good to go. If you’re going to record on the road, I recommend using Shure SM58’s as those thing are road dogs – they can take a beating and keep on going.
Road Kit
In fact, this exact setup is used by the Super Duty Tough Work Podcast (Blueprint is the producer of our show intro and ad music) and their audio is top notch.
What about Blue Yeti and the Blue Snowball Microphones?
Both of these mics also work. In fact, the first 5-10 episodes of Fragmented I used a Blue Snowball. Unfortunately, I had many problems with background noise. You could hear a door shut across the office, talking in the next room, etc. It was not good. The mic was good, but the pickup profile … not so much …
In short, these mic’s noise pick pattern is not great. Meaning that it can pick up a mouse fart at 200 yards. You don’t want that. You want a pickup profile that does not grab a ton of extraneous background noise – hence my other recommendations.
Audio Recording Software
When recording you’ll want something to grab the audio from the mic. We’ve used the following with success:
- Audio Hijack Pro
- Adobe Audition
- Reaper
- Logic
- Quicktime
- Audacity
Once you have your mic, you’ll want to grab some software to record with. Which one works the best? It’s up to you to decide.
Personally, I use Reaper. Kaushik uses Logic. I used Audio Hijack Pro before that. Why did I change? I wanted more audio editing features. If you don’t need audio editing features, then Audio Hijack Pro might be your jam.
Recording Quality Audio
There are a couple of things you need to record a good podcast.
- A quiet space with low or no echo.
- Quality Microphones
Find a Quiet Space
To record good audio, you’ll want to eliminate background noise as much as possible. Sirens, dogs barking, lawn mowers, etc will all be nearly impossible to get out of the audio in post-production.
Find the quietest room you can. This can be in your house, your office, a phone both at your office, anything
Can’t find one?
Use a Walk-In Closet
If you have one in your house/apartment use the walk-in closet. Closets are the best because they are lined with clothes which act as dampening material for sound to not reflect off of and they usually have a door of some sort that allows you to block additional sound.
The key thing is – eliminate the echo.
Kill the Echo
You’ll have echo if you have the following:
- Hard surfaced floors
- Tile
- Cement
- Wood
- Laminate
- Empty Walls
- Large Open Space
The best way to see if you have echo is to do a test recording into the microphone. I tend to talk about 10-20 seconds about what the podcast will be about and then stop the recording.
Listen to the audio, if you hear some obscene echo, you’ll need to do something about it.
The first thing you can do is try to find a smaller room/mask floors with pillows
If you are. In a very large open room, try to find a smaller room. Once you have done that (if possible) then the next step is to try to remove the echo by adding sound absorbing material like pillows, couch cushions, blankets, etc. The goal is to line as much as the floor as possible with sound absorbing material to prevent echo.
Do a test a recording again and see if it has improved and then adjust the flooring material. Sometimes, if possible, its great to put some blankets on the wall (again, if possible) to absorb the sound that is bouncing off of them.
If you can’t do that or if you don’t have enough material to line the floor … then …
Create a blanket fort
Just like you did when you were a kid. Set up a small chair, set your laptop on it and then put your recording equipment in there. Perform a test recording under the blanket again and adjust from there.
Post Production
You’ll want to go through and clean up anything you want to be removed, cleaned up, etc.
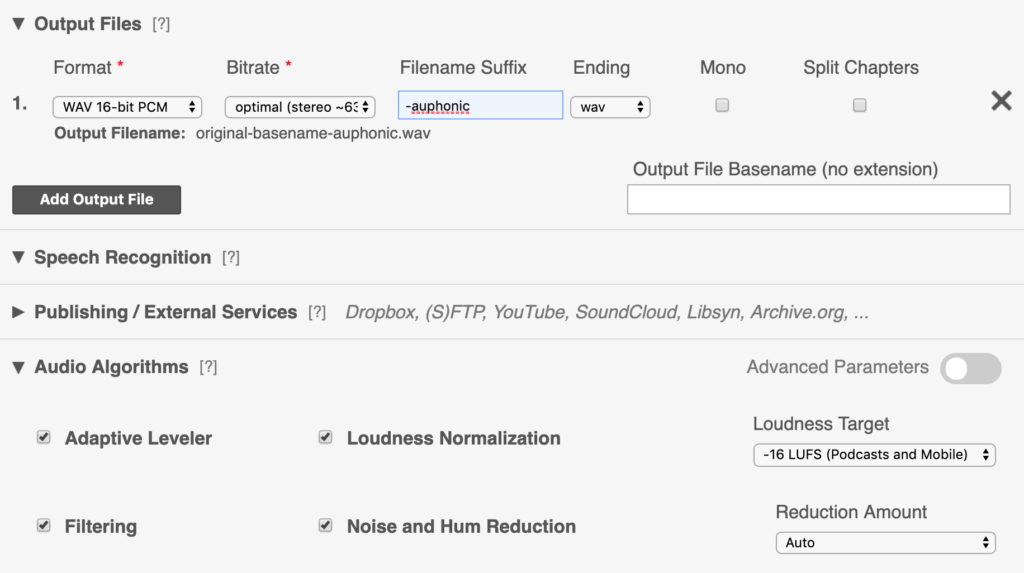
After that, upload the audio and run it through Auphonic with the following settings enabled:

This will level your audio, remove any additional hum and background noise that it can and it will make your audio pop.
That’s it. Upload it to your podcast host and start marketing.
If this helped you, please comment below and let me know about your podcast. I’d love to see it/hear it.
📷- NeONBRAND